

Strapping a surfboard onto your bicycle unlocks waves you never knew you could reach and brings real freedom to any surf trip. People worry it’s awkward or risky but did you know a solid surfboard bike rack can handle boards up to 8 feet long and keeps them steady even in crosswinds. Turns out the trickiest part is not the ride itself. It all comes down to how you set up and secure your gear before you even start pedaling.
Table of Contents
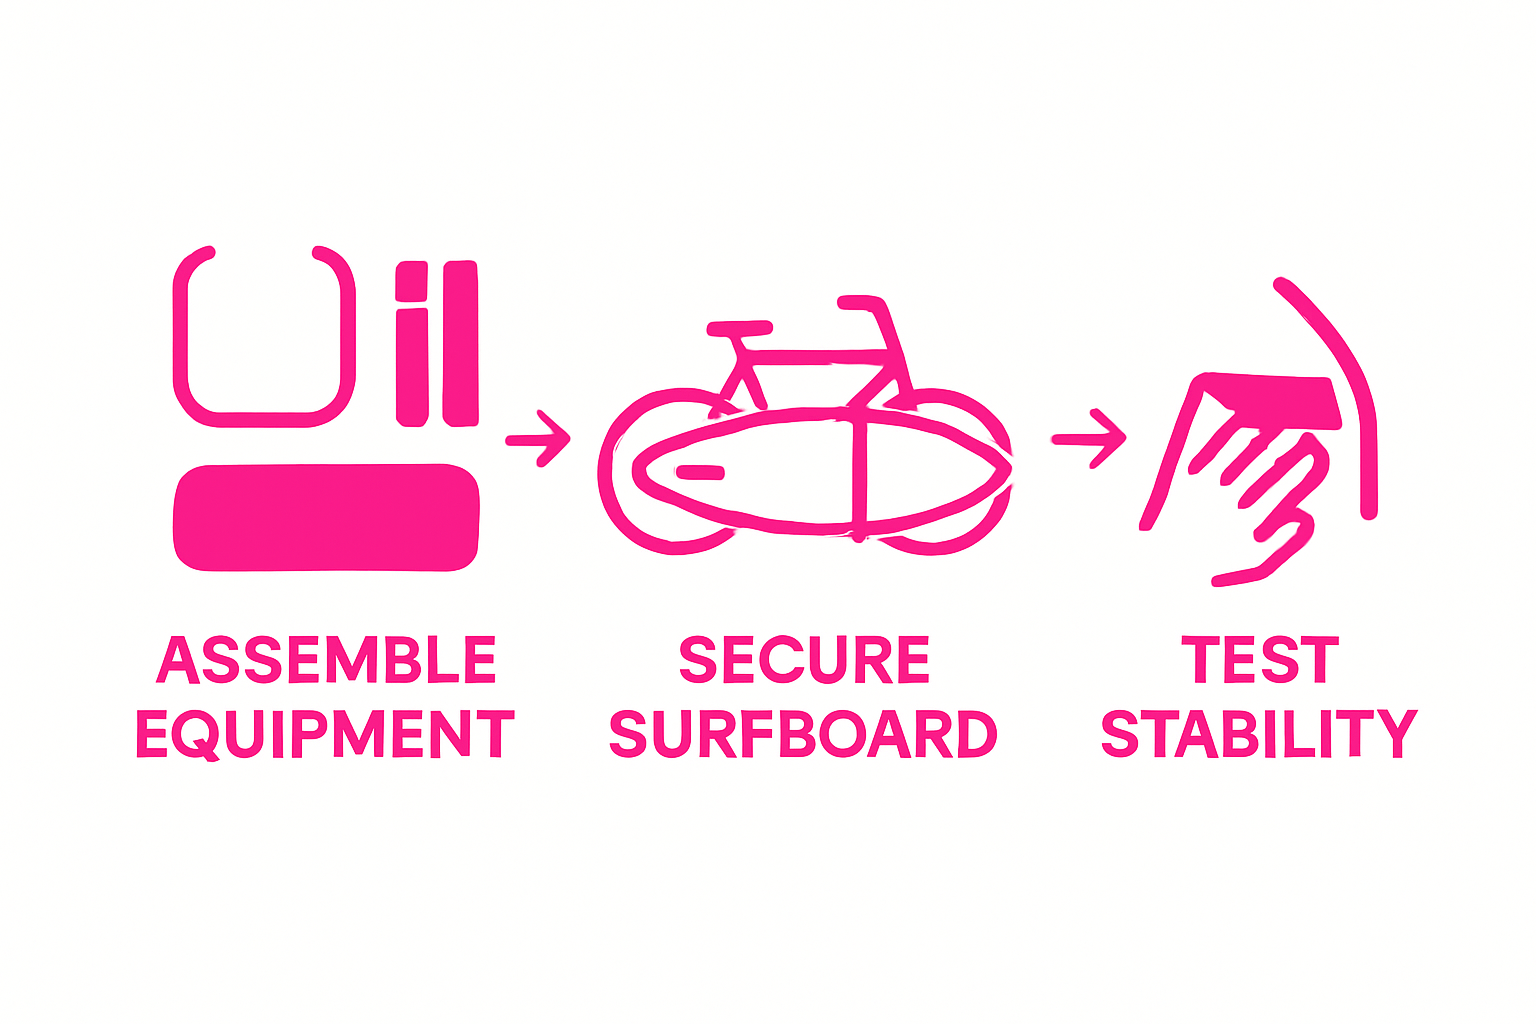
- Step 1: Gather Necessary Equipment For Transporting
- Step 2: Prepare Your Bike For Surfboard Attachment
- Step 3: Securely Fasten The Surfboard To The Bike
- Step 4: Test Stability And Adjust As Needed
- Step 5: Execute A Safe Ride With Your Surfboard
Quick Summary
| Key Point | Explanation |
|---|---|
| 1. Use a sturdy surfboard bike rack | Choose a durable rack that securely mounts to your bike to protect your board during transport. |
| 2. Inspect your bicycle thoroughly | Conduct a detailed inspection to ensure your bike can handle the additional weight and stress. |
| 3. Properly fasten the surfboard | Use multiple heavy-duty straps to tightly secure your surfboard, minimizing any movement during your ride. |
| 4. Test stability before riding | Perform a thorough stability check to confirm the board remains secure without excessive movement. |
| 5. Ride cautiously, check periodically | Maintain a slower pace and frequently inspect your setup to ensure everything is secure and stable throughout your journey. |
Step 1: Gather Necessary Equipment for Transporting
Transporting a surfboard on your bike requires careful preparation and the right equipment to ensure both your board’s safety and a smooth journey. Before you set out, you’ll need to assemble a few critical items that will make your surfboard transport experience secure and hassle free.
Essential Surfboard Transport Equipment
The first consideration is selecting an appropriate surfboard bike rack. These specialized racks come in multiple designs, but the most reliable options typically attach directly to your bicycle frame and provide a stable platform for your board. When choosing a rack, look for models constructed with durable materials like aluminum or reinforced steel that can withstand outdoor conditions and the weight of your surfboard.
Key equipment you’ll want to gather includes:
- A sturdy bicycle surfboard rack
- Strong securing straps or bungee cords
- Protective padding or foam blocks
- Optional surfboard lock for added security
The type of rack you select depends on your specific bicycle and surfboard dimensions. Some racks mount horizontally across the bike frame, while others attach vertically, allowing your board to sit alongside the bicycle. Research from cycling equipment experts suggests that vertical mounts often provide better weight distribution and reduce wind resistance during transport.
Before purchasing a rack, measure your surfboard’s length and width carefully. Not all racks are universal, and you’ll want a model that can accommodate your specific board size. Some riders opt for DIY solutions using PVC pipes and custom mounting brackets, but professionally manufactured racks offer more reliability and safety.
Additionally, consider the material of your surfboard rack. Aluminum racks are lightweight and rust resistant, making them ideal for frequent beach trips. Stainless steel options provide maximum durability but can be heavier. Padding is crucial to prevent scratches or dings on your board during transport, so invest in soft foam blocks or specialized surfboard rack cushions.
By carefully selecting and preparing your equipment, you’ll set the foundation for a safe and successful surfboard transportation experience. Each piece of gear plays a critical role in protecting your board and ensuring a smooth ride to your surfing destination.
The following table summarizes the essential equipment needed for securely transporting a surfboard on your bicycle, along with their main features and purposes.
| Equipment | Key Features | Purpose |
|---|---|---|
| Surfboard bike rack | Durable material (aluminum/steel), stable mounting | Provides a secure platform for carrying the board |
| Securing straps or bungee cords | Heavy-duty, adjustable, padded | Holds surfboard firmly to the rack |
| Protective padding/foam blocks | Soft, shock-absorbing | Prevents scratches or dings on surfboard |
| Surfboard lock (optional) | Weather-resistant, easy to use | Adds extra security against theft |
| Universal rack adapters (if needed) | Lightweight, reinforced composite | Allows non-standard bikes to attach racks |
Step 2: Prepare Your Bike for Surfboard Attachment
Before attaching your surfboard, preparing your bicycle is a critical step that ensures safe and stable transportation. A properly configured bike provides the foundation for a secure surfboard transport experience, minimizing potential risks during your journey.
Begin by conducting a thorough bicycle inspection. Check your bike’s frame and structural integrity to confirm it can handle the additional weight and stress of a surfboard. Pay special attention to the frame’s mounting points and overall stability. Research from cycling safety experts recommends examining critical components like tire pressure, brake functionality, and frame alignment before adding extra equipment.
The mounting area is crucial for surfboard attachment. Most bicycles work best with racks positioned near the seat post or along the bike’s frame. Examine your bicycle’s geometry and determine the most balanced location that won’t interfere with pedaling or steering. Some bikes have built in mounting points specifically designed for cargo, while others might require additional adapters or custom rack installations.
Key preparation steps include:
- Cleaning the bicycle frame thoroughly
- Checking tire pressure and brake systems
- Identifying optimal rack mounting locations
- Ensuring frame can support additional weight
When selecting a mounting location, consider weight distribution. Your surfboard should sit as close to the bike’s center of gravity as possible to maintain balance and stability. Avoid positions that could create dangerous side to side movement or obstruct your pedaling motion. Some cyclists prefer side mounted racks that keep the board parallel to the bicycle frame, while others opt for vertical mounts that minimize wind resistance.
If your bicycle lacks dedicated mounting points, you might need to invest in universal rack adapters. These versatile attachments can transform most standard bicycle frames into surfboard transport platforms. Look for adapters constructed from lightweight yet sturdy materials like aluminum or reinforced composite that can withstand outdoor conditions and the dynamic forces encountered during cycling.
Before finalizing your setup, perform a test fit without the surfboard. Simulate the board’s weight and movement by attaching weights or using a similar sized object. This practice run helps you identify potential issues with balance, rack stability, and overall bike handling. Make any necessary adjustments to ensure a secure and comfortable transport configuration that keeps both your bicycle and surfboard safe during transit.
Step 3: Securely Fasten the Surfboard to the Bike
Securing your surfboard to the bicycle requires precision, patience, and careful technique to ensure safe transportation. The goal is to create a stable attachment that minimizes movement while protecting both your bike and surfboard from potential damage during transit.
Initial Positioning matters significantly when attaching your surfboard. Begin by placing the board against the bike rack, ensuring it aligns parallel to the bicycle frame. The board’s nose should point in the same direction as your bike’s front wheel, creating a streamlined profile that reduces wind resistance and potential instability.
Cycling equipment research emphasizes the importance of weight distribution and secure mounting. Select heavy duty straps that can withstand outdoor conditions and provide maximum grip. Soft padding or rubber-coated straps work best, as they protect your surfboard’s surface from scratches while maintaining a firm hold.
Key fastening steps include:
- Position the surfboard centrally on the bike rack
- Use multiple straps for redundant security
- Ensure straps are tight but not overly compressed
- Check for minimal board movement before riding
Start by placing one strap around the board’s center, wrapping it completely around the bike rack and securing it tightly. A second strap near the nose and another near the tail provides additional stability. Cross the straps at slight angles to prevent the board from shifting during movement.
Avoid placing straps directly over delicate areas of the surfboard like fin boxes or graphic designs.
Tension is critical when fastening your surfboard. The straps should be tight enough to prevent movement but not so constricting that they damage the board’s structural integrity. Gently wiggle the board after initial attachment to test its stability. If you notice any significant movement or wobbling, readjust the straps and redistribute the weight.
Consider using additional securing methods like soft foam blocks between the board and bike rack. These blocks help absorb vibrations and prevent direct metal contact with your surfboard. Some cyclists also use bungee cords as a supplementary security measure, creating an extra layer of protection against unexpected movement.
Before setting out, perform a comprehensive final check. Walk beside your bicycle and observe the surfboard’s positioning. Simulate potential bumps and turns to ensure the board remains stable. A well secured surfboard should feel like a natural extension of your bicycle, moving smoothly and without unnecessary wobbling or shifting.
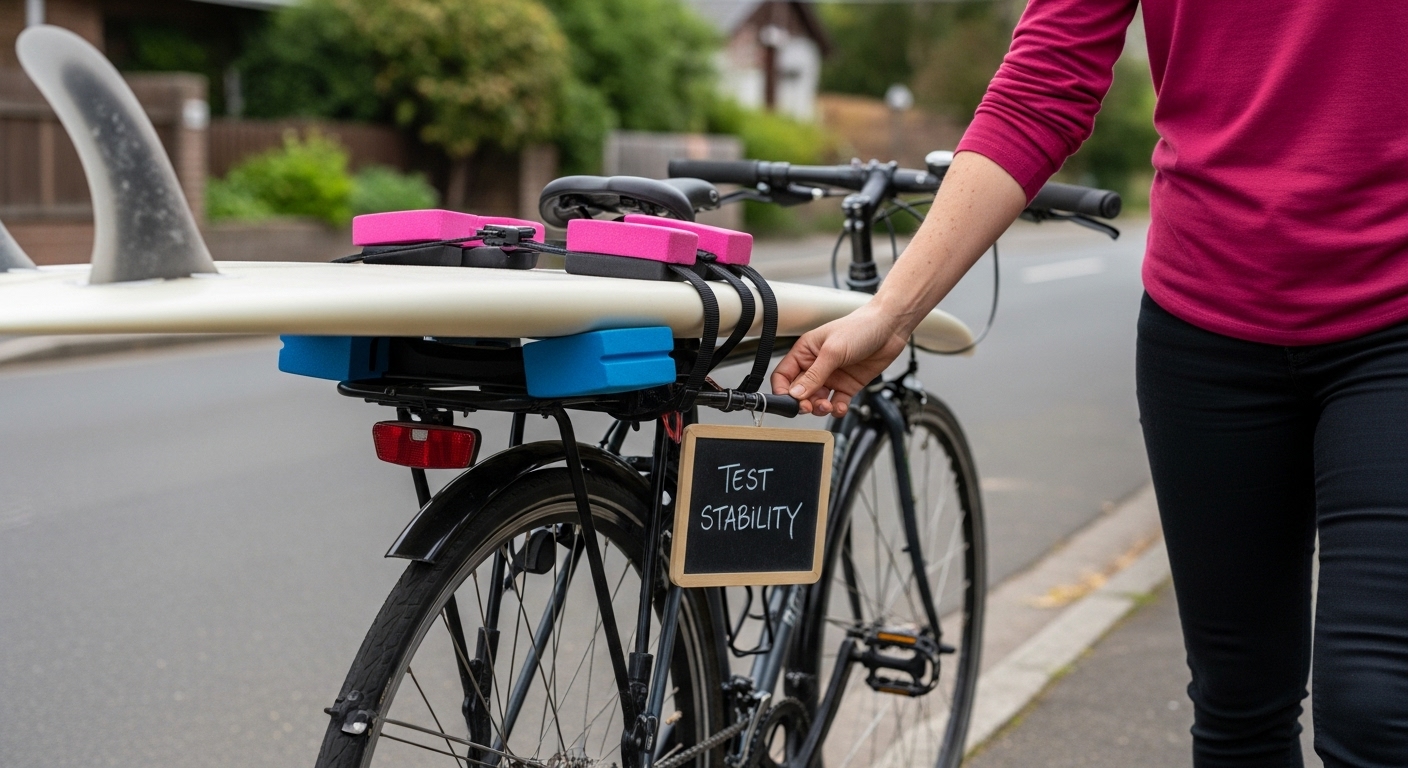
Step 4: Test Stability and Adjust as Needed
Testing the stability of your surfboard attachment is a critical final step that ensures your safety and protects your equipment during transportation. This phase requires careful evaluation and potentially multiple adjustments to achieve optimal mounting configuration.
Initial Stability Assessment begins with a comprehensive visual and physical inspection. Stand beside your bicycle and gently attempt to move the surfboard, checking for any unnecessary wiggle or play in the mounting system. Research from bicycle safety experts suggests that minimal movement indicates a secure attachment, while excessive shifting signals the need for immediate reconfiguration.
Key testing procedures include:
- Simulate riding conditions by walking the bicycle
- Check surfboard movement at different angles
- Verify strap tension and rack stability
- Listen for any unusual sounds during movement
Practical testing involves several progressive stages. Start by walking alongside your bicycle, paying close attention to how the surfboard responds to movement. The board should remain rigid and aligned with the bicycle frame, without swinging or creating lateral pressure. When you encounter slight bumps or uneven terrain, observe how the mounting system absorbs and distributes potential impact.
If you detect any instability, focus on three primary adjustment areas. First, recheck the strap tension, ensuring they are uniformly tight without compressing the surfboard. Uneven pressure can create weak points that compromise overall stability. Second, examine the rack’s mounting points on the bicycle frame. Loose connections can introduce unexpected movement that increases risk during transportation.
Fine Tuning Techniques involve incremental adjustments. Add protective padding between the surfboard and rack contact points to reduce friction and absorb minor vibrations. Some cyclists use additional foam blocks or rubber cushioning to create a more stable interface. Consider repositioning the board slightly, shifting its center of gravity to achieve better weight distribution.
Before embarking on longer journeys, conduct a short test ride in a controlled environment. Choose a quiet street or parking lot where you can safely evaluate the surfboard’s performance. Ride at different speeds, make gentle turns, and assess how the board responds to dynamic movement. Pay attention to any unusual sounds, vibrations, or shifts that might indicate a need for further adjustment.
Remember that perfect stability is about continuous monitoring and willingness to make real time modifications. No single mounting configuration works identically for every surfboard and bicycle combination. Your careful attention and periodic reassessment will ensure a safe and secure transportation experience.
This table presents a step-by-step overview of transporting a surfboard by bike, including the main action for each stage and the key outcome to expect.
| Step | Main Action | Key Outcome |
|---|---|---|
| Gather Necessary Equipment | Collect racks, straps, padding, and adapters | Have all gear ready for secure surfboard setup |
| Prepare Your Bike for Surfboard Attachment | Inspect bike and determine mounting location | Bike is ready to safely support the rack/board |
| Securely Fasten the Surfboard | Attach surfboard using straps and padding | Surfboard is tightly secured to the bike |
| Test Stability and Adjust as Needed | Check for movement and adjust as necessary | Stable transport setup with minimal shifting |
| Execute a Safe Ride | Ride cautiously and perform periodic checks | Safe arrival at surfing destination |
Step 5: Execute a Safe Ride with Your Surfboard
Safely transporting your surfboard on a bicycle requires heightened awareness and strategic riding techniques that protect both your equipment and yourself during the journey. The final execution of your ride demands careful attention to multiple factors that can impact your overall safety and transportation experience.
Riding Technique becomes paramount when carrying a surfboard. Your bicycle’s additional weight and length will fundamentally change its handling characteristics. Maintain a slower, more deliberate pace than usual, especially when starting, stopping, and navigating turns. Create wider turning arcs and anticipate the increased stopping distance required by the extra weight and extended profile of your surfboard.
Key safety considerations include:
- Ride at a reduced speed
- Maintain extra distance from other vehicles
- Use hand signals prominently
- Stay highly visible with bright clothing
Traffic safety research emphasizes the importance of predictable movement and maximum visibility. Wear bright or reflective clothing that ensures drivers can easily spot you. Use hand signals well in advance of turns or stops, exaggerating your movements to compensate for the larger profile created by your surfboard.
Special attention must be given to road conditions and terrain. Uneven surfaces, gravel, or sudden bumps can potentially compromise your surfboard’s attachment. Approach these areas with extreme caution, reducing speed and maintaining a firm but relaxed grip on the handlebars. Your body should act as a shock absorber, subtly adjusting to minimize transferring unexpected jolts to your surfboard mounting system.
Wind becomes a significant factor when transporting a surfboard. A large board acts like a sail, potentially creating unexpected lateral forces that can destabilize your bicycle. Ride in a more upright position, keeping your center of gravity low and maintaining a firm but relaxed grip. When encountering strong crosswinds, reduce your speed and be prepared to dismount if conditions become challenging.
Periodic Checks are crucial during your ride. Every few miles, find a safe location to stop and inspect your surfboard’s mounting. Quickly verify that straps remain tight, the board hasn’t shifted, and no unusual wear is developing on either the rack or the surfboard. These brief safety checks can prevent potential equipment failures before they become serious problems.
Below is a troubleshooting table to help address common issues you might encounter when transporting your surfboard by bicycle, with possible causes and recommended solutions based on the article content.
| Problem | Possible Cause | Recommended Solution |
|---|---|---|
| Surfboard shifts while riding | Loose straps or uneven tension | Stop safely, retighten straps, adjust padding |
| Significant board movement | Poor rack positioning | Reposition rack for better weight balance |
| Scratches on surfboard | Lack of sufficient padding | Add or rearrange foam/soft padding |
| Difficult steering | Board not aligned with bike frame | Realign board parallel to frame |
| Rack or straps vibrating | Loose mounting points | Inspect and tighten rack mounting hardware |
Mental preparation is as important as physical technique. Approach your ride with patience and a heightened sense of awareness. Your surfboard is not just cargo but an extension of your bicycle that requires constant, subtle management. Stay calm, ride defensively, and remember that arriving safely is more important than arriving quickly.
Protect Your Surfboard and Wetsuit After Every Ride
After you put so much care into securing your surfboard on your bike and ensuring it arrives safely, don’t let the job end there. One major pain point mentioned in this article is protecting your precious gear from damage during every step of transport. Whether it’s dings from bumpy rides or soggy wetsuits after long sessions, you want your equipment to last as long as possible so you can focus on the waves and not the wear and tear.
Take your gear care to the next level with heavy duty wetsuit hangers from SurfVida. Our hangers cradle your wetsuit’s shoulders to protect the neoprene and support up to 15kg of wet gear—no more stretching or quick wear. The foldable, 3D-printed design means easy storing and fast drying, so your setup stays organized after every trip. Ready to upgrade your post-session routine and give your equipment the care it deserves? Visit SurfVida’s main site now and experience the best gear care solution for surfers who bike to their favorite break.
Frequently Asked Questions
How do I choose the right surfboard bike rack?
Selecting the right surfboard bike rack involves considering your bike’s frame, the dimensions of your surfboard, and the mounting style of the rack. Look for durable materials like aluminum or reinforced steel, and ensure that it securely fits your board’s size.
What should I check on my bike before securing the surfboard?
Before attaching your surfboard, inspect your bike for structural integrity, check tire pressure, and ensure brake functionality. Also, identify the optimal mounting location for the rack that won’t obstruct pedaling or steering.
How can I ensure my surfboard is securely fastened during transport?
To secure your surfboard, position it on the rack and use heavy-duty straps to tightly fasten it at multiple points. Ensure the straps are tight but not overly compressed to avoid damaging the board. Adding protective padding can also help absorb vibrations.
What should I do if my surfboard shifts while riding?
If your surfboard shifts while riding, find a safe place to stop and check the strap tension and mounting system. Readjust the straps as needed and securely refit any protective padding to ensure stability for the remainder of your journey.