

Getting your surfboard stand up technique right can be the difference between riding a wave and wiping out in seconds. Most beginners believe surfing is all about balance or just the board you buy. That changes fast when you learn that the key stand up motion usually takes less than one second to execute, and that super short burst makes or breaks your ride.
Table of Contents
- Step 1: Choose The Right Surfboard For Your Style
- Step 2: Prepare Your Gear And Safety Equipment
- Step 3: Find The Ideal Spot For Practice
- Step 4: Position Yourself Correctly On The Surfboard
- Step 5: Execute The Stand Up Movement
- Step 6: Verify Your Stance And Balance
Quick Summary
| Key Point | Explanation |
|---|---|
| 1. Choose suitable surfboard type | Select longer, wider boards for beginners for stability; experienced surfers may prefer shorter boards for agility. |
| 2. Ensure proper gear preparation | Check wetsuit fit, apply wax, and use a leash for safety; inspect all equipment before surfing. |
| 3. Find ideal practice location | Look for gentle waves and soft sandy beaches; practice during mid-tide for best conditions. |
| 4. Maintain correct body position | Start lying flat; align body with the surfboard’s center; engage core for balance when transitioning to standing. |
| 5. Execute the stand-up movement smoothly | Use an explosive push-up technique; bring your feet under you swiftly to maintain balance while standing. |
Step 1: Choose the Right Surfboard for Your Style
Choosing the right surfboard is crucial to mastering your surfboard stand up technique. Your board is more than just equipment - it’s an extension of your body and style on the water. The perfect surfboard can transform your surfing experience, making the stand up process smoother and more intuitive.
Understanding board types is fundamental to selecting the right surfboard. Beginners typically benefit from longer, wider boards with more volume, which provide greater stability and easier paddling. These boards, often called longboards or funboards, offer a more forgiving platform for learning the surfboard stand up technique. Experienced surfers might prefer shorter, more responsive boards that allow for more dynamic movements.
Consider your body type, fitness level, and surfing goals when selecting a board. Heavier or taller surfers might need boards with more volume and length to provide adequate buoyancy and stability. Smaller or more agile surfers can often manage shorter, more maneuverable boards. Your physical attributes directly impact how easily you’ll be able to perform the surfboard stand up motion.
The table below compares common surfboard types discussed in the guide, summarizing their main features and suitability for different skill levels.
| Surfboard Type | Main Features | Best For | Stability Level |
|---|---|---|---|
| Longboard | Long, wide, lots of volume | Beginners | High |
| Funboard | Mid-length, moderate width | Beginners/Interm. | High/Medium |
| Shortboard | Short, narrow, less volume | Experienced | Low |
| Foam Board | Soft, extra stable, safe | Beginners | Very High |
| Fiberglass/Epoxy | Hard, responsive, durable | Intermediate/Adv. | Medium |
Board materials also play a significant role in performance. Foam boards are excellent for beginners, offering soft, stable surfaces that reduce injury risks during learning. Fiberglass and epoxy boards provide more advanced performance characteristics but require more skill to manage effectively. According to Surfing England, matching your board to your skill level is critical for developing proper technique and confidence.
When testing boards, pay attention to how the board feels beneath you. A board that feels natural and comfortable will make your surfboard stand up technique much easier to learn. Don’t be afraid to try multiple boards or seek advice from experienced surf shop professionals who can provide personalized recommendations based on your specific needs and aspirations.
Step 2: Prepare Your Gear and Safety Equipment
Preparing your gear and safety equipment is a critical step in mastering the surfboard stand up technique. This preparation goes beyond simply gathering equipment - it’s about creating a foundation for a safe, confident surfing experience. Your equipment can mean the difference between an exhilarating ride and a potentially dangerous situation.
Start by assembling your core surfing essentials. Your wetsuit should fit snugly but allow full range of motion, ensuring you can move freely while maintaining body temperature. Check for any tears or wear that might compromise its effectiveness. Apply a generous layer of surfboard wax to your board’s deck, creating crucial grip points that will help you maintain stability during your stand up attempt. The wax creates microscopic ridges that prevent slipping, giving you maximum control during those critical first moments of rising on the board.
Safety equipment is non negotiable. According to the Royal National Lifeboat Institution, a proper leash is your most important safety tool. The leash keeps your board nearby if you fall, preventing it from becoming a dangerous projectile and ensuring you can quickly recover. Choose a leash length matching your surfboard - typically the same length or slightly longer. For beginners learning the surfboard stand up technique, a slightly longer leash provides extra forgiveness during initial attempts.
Before heading into the water, perform a comprehensive equipment check. Inspect your surfboard for any dings or cracks that could compromise its structural integrity.
The following table outlines the necessary gear and safety items for preparing to surf, including their main purposes as referenced in the guide.
| Item | Purpose | Preparation Tips |
|---|---|---|
| Wetsuit | Keeps you warm, protects skin | Check fit; inspect for damage |
| Surfboard Wax | Provides grip to prevent slipping | Apply generously over deck |
| Leash | Safety; keeps board close | Choose length to match board |
| Surfboard | Main equipment for riding waves | Check for cracks, dings, loose fins |
| Sunscreen | Protects skin from UV exposure | Apply before entering water |
| Whistle | Safety; emergency signaling | Attach to person or suit |
| First Aid Kit | Addresses minor injuries | Pack in gear bag for each session |
Step 3: Find the Ideal Spot for Practice
Finding the perfect practice location is crucial for successfully learning your surfboard stand up technique. Not all beaches are created equal, and selecting the right environment can dramatically impact your learning curve. Beginners need gentle, predictable waves that provide a forgiving introduction to surfing.
Look for beaches with long, gradual sandy slopes and minimal rocky terrain. These locations offer consistent, rolling waves that break slowly and provide ample time to practice your stand up motion. Beach breaks with small, uniform waves between 1-3 feet are ideal for novice surfers. Avoid areas with strong currents, sharp underwater rocks, or complex wave patterns that can complicate your learning process. Local surf schools or experienced surfers can often recommend specific beach sections best suited for beginners.
Tide conditions play a significant role in wave quality and safety. Mid-tide periods typically offer the most stable and predictable wave environments. Check local tide charts and aim to practice during times when waves are moderate and consistent. Early morning or late afternoon sessions often provide calmer water conditions with fewer crowds, giving you more space and confidence to practice your technique.
According to Surfing England, understanding local wave characteristics is essential for safe and effective learning. Before entering the water, spend time observing wave patterns. Watch how waves break, identify potential hazards, and study other surfers’ movements. This observation period helps you understand the specific dynamics of your chosen practice spot. Pay attention to wave direction, potential rip currents, and any underwater obstacles that might pose risks during your surfboard stand up attempts. By carefully selecting and studying your practice location, you’ll create a safer, more supportive environment for developing your surfing skills.
Step 4: Position Yourself Correctly on the Surfboard
Positioning yourself correctly on the surfboard is a fundamental skill that directly impacts your ability to successfully stand up and ride waves. Your body placement determines balance, control, and overall surfing performance. Think of the surfboard as an extension of your body, requiring precise alignment and strategic weight distribution.
Begin by lying prone on the board, centered along its length with your body positioned slightly forward of the board’s midpoint.
Place your hands flat on the board beside your chest, just underneath your shoulders. Your feet should be together at the board’s tail, with toes pointed toward the back. This starting position creates a stable platform for transitioning from lying down to standing up. Maintaining a straight line from head to toes helps you maintain balance and reduces unnecessary movement that could destabilize your board.
Body alignment is critical during the transition. Keep your head up and look forward, not down at the board. Looking down breaks your balance and disrupts the smooth motion of standing. Your chest should be slightly raised, creating a cobra-like pose that allows quick, fluid movement. Practice engaging your core muscles, which provide the strength and stability needed to push yourself up smoothly. Distribute your weight evenly, ensuring the board remains level and steady as you prepare to stand.
According to University of Washington research, proper positioning helps prevent common surfing injuries by reducing strain on your neck and back muscles. As you practice, focus on creating muscle memory for this precise positioning. Start in calm waters where you can repeatedly practice the motion without wave interference. Place your board on soft sand and simulate the movement, training your body to recognize the exact positioning and muscle engagement required for a smooth surfboard stand up. With consistent practice, these positioning techniques will become second nature, transforming your surfing technique from hesitant to confident.
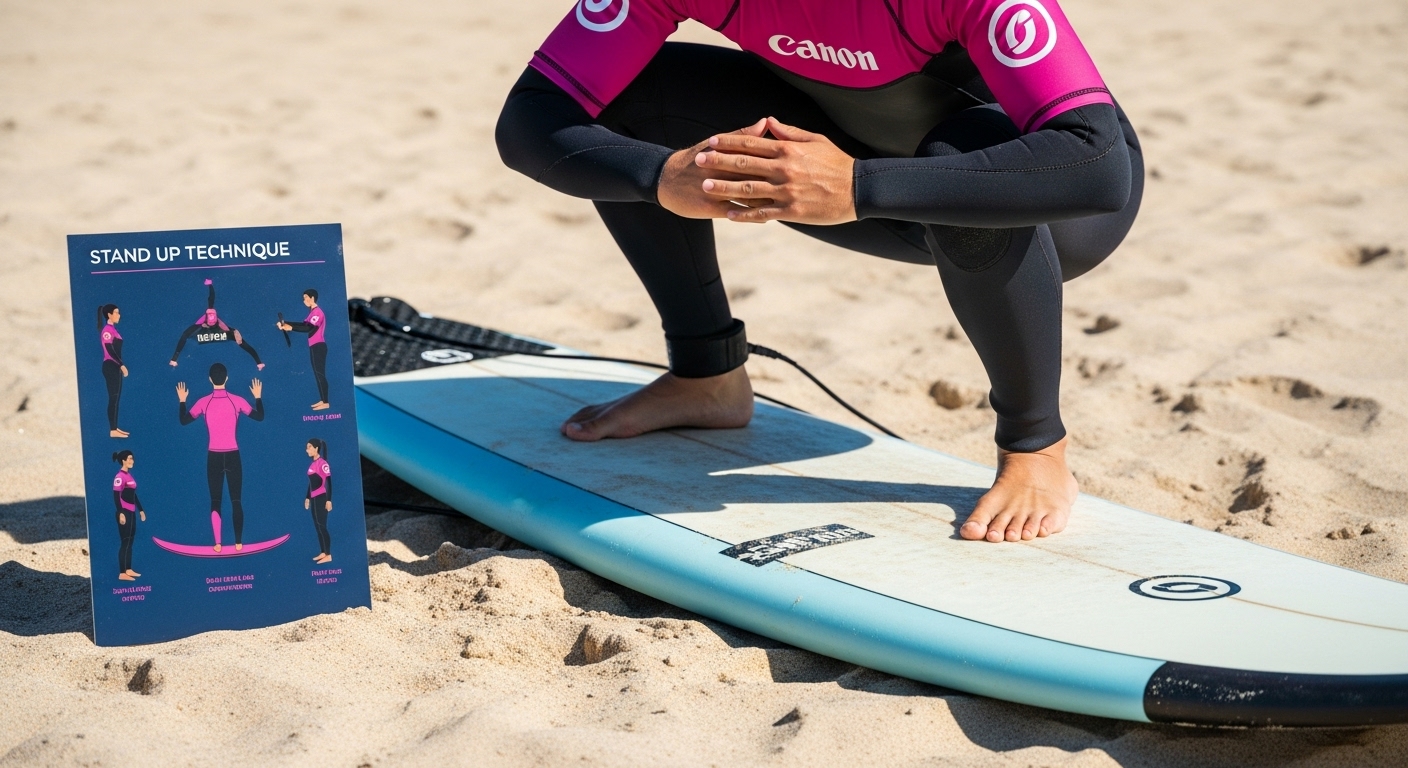
Step 5: Execute the Stand Up Movement
The surfboard stand up movement is a precise, dynamic technique that transforms you from a prone paddling position to a balanced standing stance. This transition requires a combination of strength, timing, and body awareness. Think of it as a fluid, explosive motion that demands both physical skill and mental focus.
Begin the stand up movement by positioning your hands flat on the board, slightly wider than shoulder width. As a wave approaches and starts to lift your board, place your hands firmly beneath your chest, creating a push-up like position. Your arms should form a right angle, with elbows close to your body. The key is to generate a powerful, explosive push that lifts your entire body in one smooth motion. Engage your core muscles and use your arms to thrust your body upward, keeping your back straight and head looking forward.
As you push up, simultaneously swing your front foot between your hands, positioning it where your chest was previously located.
INFOGRAPHIC:infographic_content] This swift, coordinated movement requires practice to master. Your back foot will naturally follow, landing behind your front foot in a balanced, sideways stance. Keep your knees slightly bent, weight centered, and arms out for balance. Precision is crucial - too slow, and you’ll miss the wave; too fast, and you’ll lose balance. According to research from the [University of Washington, the entire pop-up movement typically takes just over one second, highlighting the need for efficient, practiced technique.
Practice this movement repeatedly on land before attempting it in water.
 Use a yoga mat or soft surface to simulate the board’s feel. Start slowly, breaking down each component of the movement, then gradually increase speed. Focus on building muscle memory, ensuring your body learns the exact sequence of movements. Mental visualization can be as important as physical practice - imagine the smooth, powerful motion of standing up, creating a mental blueprint that your body will follow when you’re actually riding a wave.
Step 6: Verify Your Stance and Balance
Verifying your stance and balance is the critical moment that determines your success in riding a wave. Your body position can mean the difference between gracefully gliding and unexpectedly tumbling into the water. This step is about creating a stable, dynamic foundation that allows you to respond to the wave’s constantly changing surface.
Your ideal surfing stance should feel natural yet intentional. Position your feet shoulder-width apart, with your front foot near the board’s center and your back foot slightly behind. Your knees should be softly bent, creating a low center of gravity that enhances stability. Imagine your body as a shock absorber, ready to adjust to the wave’s movement. Keep your weight evenly distributed, with a slight bias toward your front foot to maintain forward momentum. Your arms should be relaxed but ready, positioned slightly away from your body to help maintain balance.
Body alignment is crucial. Your head should remain upright and looking forward, not down at your feet. A common beginner mistake is dropping the gaze, which immediately disrupts balance and breaks your connection with the wave. Engage your core muscles, which act as your body’s natural stabilization system. Think of your torso as a solid column, providing strength and flexibility simultaneously. Subtle weight shifts and ankle adjustments will help you maintain balance, allowing you to read and respond to the wave’s unique characteristics.
According to research from the University of Washington, balance is a dynamic skill that improves with consistent practice. To verify your stance, perform a quick internal check. Ask yourself: Are my feet positioned correctly? Do I feel stable? Can I make small adjustments without losing balance? If you can answer yes to these questions, you’ve successfully established a solid surfing stance. Remember, balance is not about being rigid, but about being adaptable. Each wave presents a new challenge, and your ability to adjust quickly will determine your surfing success.
Elevate Your Surfboard Stand Up Experience With Essential Gear
You have just learned how critical the right gear is to mastering your surfboard stand up technique. Every step in your journey, from finding stability on the board to nailing that perfect stand up motion, hinges on having quality equipment that supports your progress and keeps you safe. A neglected detail like an improperly dried or damaged wetsuit can slow you down, destroy your confidence, or even put you at risk the next time you paddle out. Why let wet suits ruin your hard-earned surfboard stand up skills when perfect gear care is only one smart step away?

Take control of your surfing future with our Wetsuit Hangers, designed to preserve and quickly dry your wetsuit after every session. These hangers hold up to 15kg and protect the neoprene, ensuring your suit performs at its best for longer. Their foldable, wide-shoulder design makes storage and handling effortless. Upgrade your surf routine with eco-friendly gear care that matches your commitment out on the waves. Visit Surf Vida and discover the tools trusted by surfers who take their skills seriously. Don’t compromise your next session. Get your wetsuit dry, protected, and ready—act now to keep progressing on your surfboard stand up journey.
Frequently Asked Questions
What type of surfboard is best for beginners?
Longer, wider boards with more volume, such as longboards or funboards, are best for beginners as they provide greater stability and easier paddling, making the stand up process smoother.
How should I prepare my surfing gear before hitting the water?
Make sure your wetsuit fits properly, check your surfboard for any damage, apply surfboard wax for grip, and ensure you have a proper leash attached to your board for safety.
What should I look for in a practice spot when learning to surf?
Choose a beach with gentle, consistent waves and a sandy slope. Avoid locations with strong currents and rocky terrain, and aim to practice during mid-tide periods for the best wave conditions.
How can I improve my balance while surfing?
Maintain a shoulder-width stance with slightly bent knees, keep your head up and look forward, engage your core, and practice making small weight shifts to adapt to the wave’s movement.
Recommended
- News – Surf Vida
- Heavy-Duty Wetsuit Hanger – Surf Vida
- Wetsuit Hangers – Surf Vida
- Schwimmen lernen im Alter: Schritt-für-Schritt zum Erfolg