

Strapping your surfboard to your car sounds simple enough but a small mistake can leave you with a cracked board or worse. Most surfers know the pain of watching a board shift or slide during a drive. Over 75 percent of surfboard transit damage happens because of poor strapping or failed rack systems. You might think any old strap will do but choosing the wrong materials or skipping a quick inspection is the fastest way to ruin your session before you even hit the waves.
Table of Contents
- Step 1: Gather Necessary Equipment And Materials
- Step 2: Prepare The Surfboard Rack For Installation
- Step 3: Attach Surfboard Rack Straps To The Rack
- Step 4: Securely Fasten Surfboards Using The Straps
- Step 5: Verify Stability And Proper Strap Tension
Quick Summary
| Key Point | Explanation |
|---|---|
| 1. Use high-quality surfboard rack straps | Durable straps minimize the risk of damage during transportation, ensuring your surfboard stays secure. |
| 2. Thoroughly prepare and clean your roof rack | A clean and dry surface enhances strap grip, reducing slippage and potential hazards. |
| 3. Verify strap tension and symmetry | Properly tightened and evenly placed straps prevent stress points, protecting your board during transit. |
| 4. Perform a dry run before securing | Testing the strap placement helps identify adjustments needed for optimal fit and stability. |
| 5. Inspect straps for damage pre-trip | Regular checks ensure no wear or fraying that could lead to strap failure, keeping your equipment safe. |
Step 1: Gather Necessary Equipment and Materials
Preparing to secure your surfboard for transportation begins with carefully selecting and gathering the right surfboard rack straps and supporting equipment. Your preparation will determine the safety and stability of your board during transit, making this initial step crucial for preventing potential damage or loss.
Start by collecting a comprehensive set of surfboard rack straps designed specifically for marine and transportation use. High quality straps are critical and should feature durable materials like heavy duty polyester or nylon webbing with robust buckle mechanisms. Look for straps with padded sections that protect your surfboard’s delicate surface from friction and potential scratching during securing and transportation.
Your essential equipment collection should include multiple items beyond just the straps themselves. Here are key components you will need:
- Surfboard rack straps with sturdy metal or plastic buckles
- Soft protective padding or cloth sleeves
- Clean microfiber towel for board surface preparation
- Measuring tape to ensure proper strap length
- Work gloves for handling equipment safely
Before purchasing surfboard rack straps, carefully measure your vehicle’s roof rack and surfboard dimensions. This preparatory step ensures you select straps with appropriate length and weight capacity. Professional surfboard enthusiasts recommend choosing straps that can comfortably accommodate boards ranging from shortboards to longboards, typically between 6 to 10 feet in length.
Consider the specific environmental conditions you will encounter during transportation. Saltwater environments demand corrosion resistant materials, while frequent travelers might prioritize straps with quick release mechanisms and enhanced UV protection. Weather resistance is a key factor in selecting the right equipment.
Inspect each strap thoroughly before your trip, checking for any signs of wear, fraying, or structural weakness. Straps with compromised integrity can fail during transportation, potentially causing significant damage to your surfboard or creating dangerous situations on the road. Running your hands along the entire length of each strap allows you to detect subtle imperfections that might not be immediately visible.
By meticulously gathering and preparing your surfboard rack straps and supporting equipment, you set the foundation for a safe and secure transportation experience.
Here is a table listing the essential tools and materials required for preparing your surfboard and rack straps, including their specifications and primary purpose.
| Item | Specification | Purpose |
|---|---|---|
| Surfboard rack straps | Heavy-duty polyester/nylon, robust buckle | Securely fasten surfboard to vehicle rack |
| Protective padding/cloth sleeves | Soft, durable material | Prevent surface scratches/friction damage |
| Microfiber towel | Lint-free, clean | Prepare/clean board and rack surfaces |
| Measuring tape | Sufficient length for rack and board | Measure proper strap length and placement |
| Work gloves | Durable, comfortable fit | Safely handle straps and rack equipment |
Step 2: Prepare the Surfboard Rack for Installation
Transitioning from equipment gathering to rack preparation requires precision and careful attention. Preparing your surfboard rack correctly ensures a stable and secure mounting system that will protect your board during transportation. Thorough preparation prevents potential equipment failure and minimizes risks associated with improper installation.
Begin by thoroughly cleaning and inspecting your vehicle’s roof rack or mounting surface. Accumulated dirt, salt residue, or debris can compromise the straps’ grip and potentially damage both your vehicle and surfboard. Use a clean microfiber cloth to wipe down the entire surface, removing any grime or particles that might interfere with the rack straps’ performance. Pay special attention to mounting points and connection areas where straps will make direct contact.
Your rack surface must be completely dry before proceeding. Moisture can create slippage and reduce the effectiveness of your surfboard rack straps. If you’ve recently washed your vehicle or encountered wet conditions, allow sufficient time for the surface to air dry completely. Patience during preparation prevents potential accidents.
Here are critical checkpoints for rack preparation:
- Verify rack structural integrity and load capacity
- Check for any rust or structural damage
- Ensure mounting points are clean and undamaged
- Confirm rack is securely attached to vehicle
For those with aftermarket or specialized roof racks, check out our guide on surf gear storage solutions to understand additional mounting considerations. Different rack designs require unique approaches to secure surfboards effectively.
Measure the mounting points precisely to determine the optimal placement for your surfboard rack straps. Consistent spacing and symmetrical positioning are crucial for balanced weight distribution. Use a measuring tape to mark exact locations where straps will attach, ensuring they provide maximum stability without creating undue stress on any single point.
Consider the specific dimensions of your surfboard when planning rack placement. Longboards and shortboards require different mounting strategies. Wider boards might need additional support points, while narrower boards can be secured with minimal contact. Strategic positioning prevents potential board damage during transit.
Finalize your preparation by performing a preliminary dry run. Position your straps without fully securing them, visualizing how they will interact with your surfboard and rack. This practice allows you to identify potential challenges or adjustment requirements before actual installation, saving time and reducing the risk of mistakes during the critical securing process.
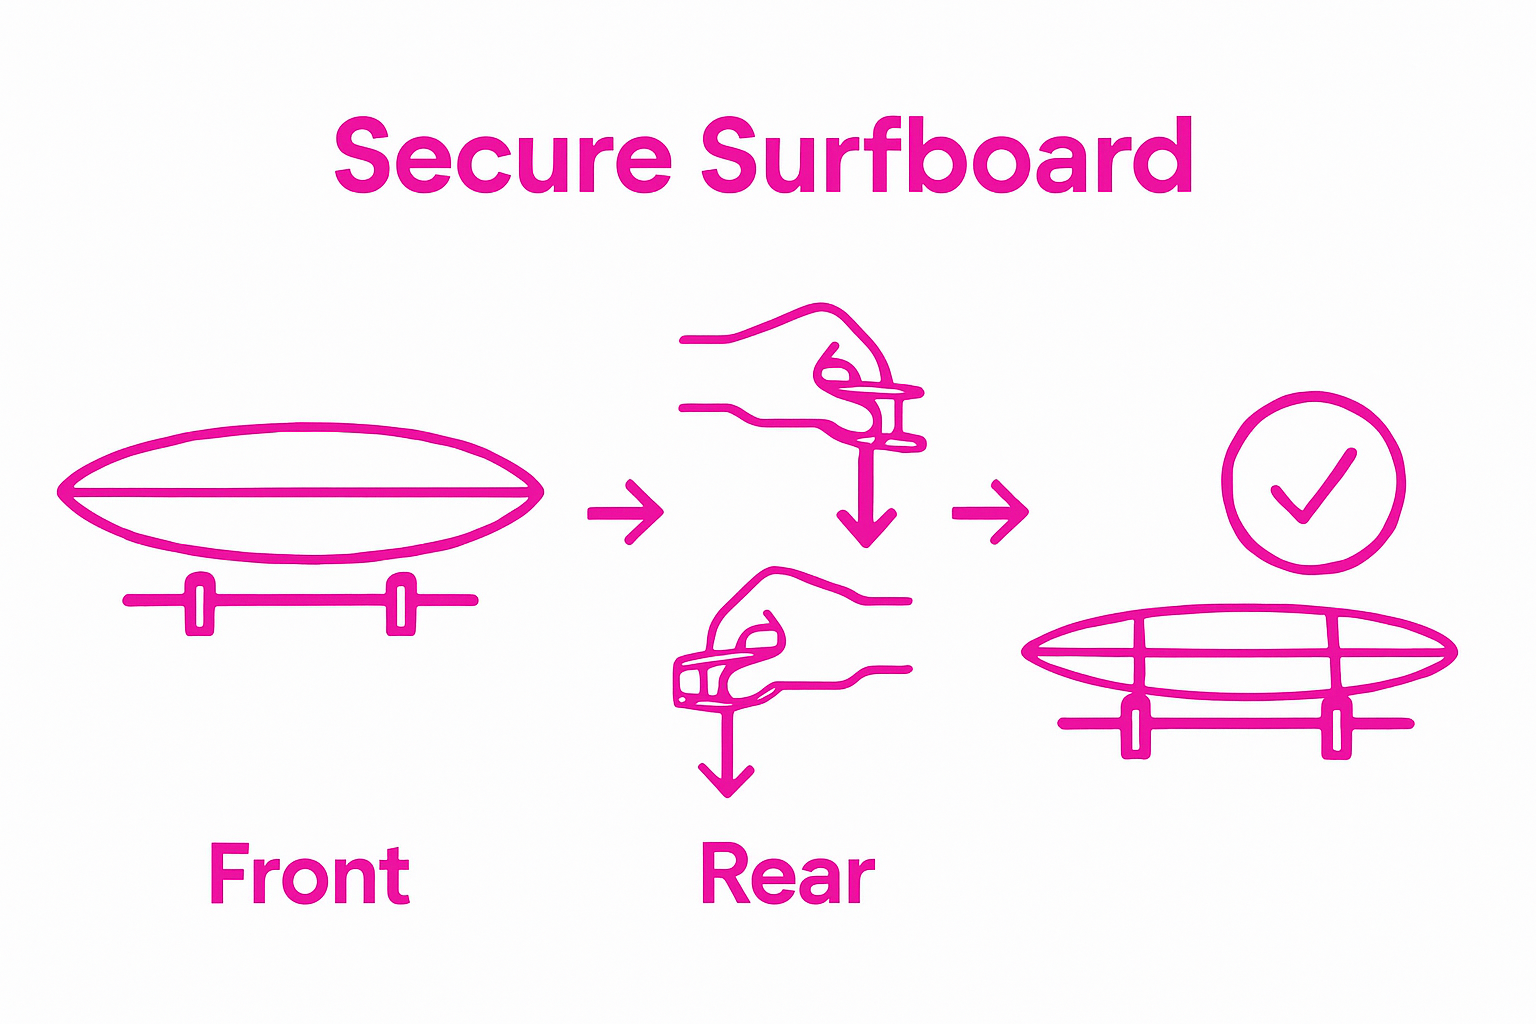
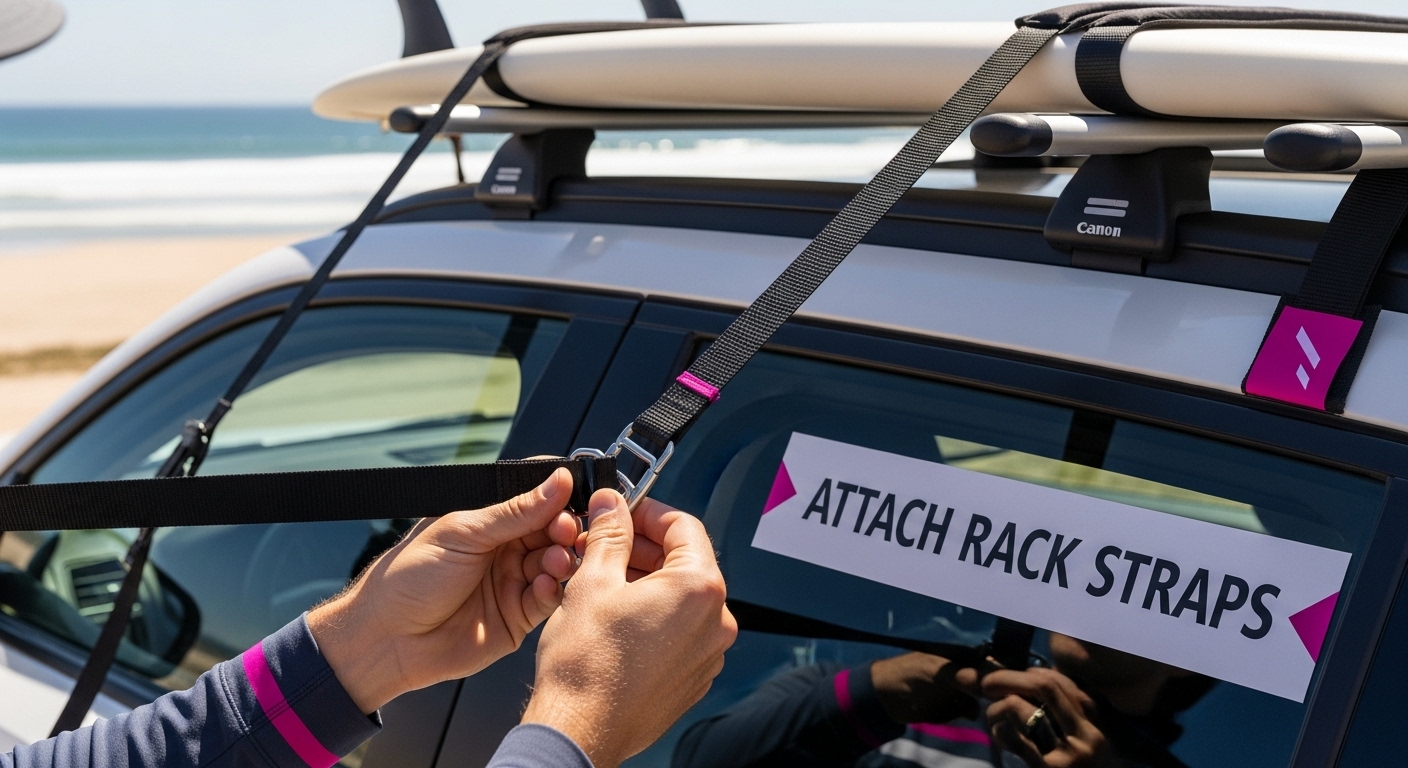
Step 3: Attach Surfboard Rack Straps to the Rack
Attaching surfboard rack straps requires precision and careful technique to ensure your board remains securely fastened during transportation. Proper attachment is the critical bridge between preparation and safe travel, transforming your carefully selected equipment into a reliable surfboard transportation system.
Begin by positioning the first strap at the front mounting point of your roof rack. Align the strap with the predetermined measurement marks you established during rack preparation. Wrap the strap around the rack crossbar, ensuring it passes completely around the bar with enough slack to accommodate your board’s width. Avoid twisting the strap, as this can compromise its holding strength and potentially damage your equipment.
The buckle mechanism demands special attention during attachment. Align the buckle so it sits flat against the rack, allowing for smooth tightening and maximum grip. Some surfboard rack straps feature quick release mechanisms that require specific positioning. If your straps have padding, orient the protective sections to face your surfboard, creating a buffer against potential scratching or friction.
Here are critical considerations during strap attachment:
- Maintain consistent tension across both straps
- Ensure buckles are facing outward for easy adjustment
- Check that straps are not twisted or overlapping
- Verify strap width matches rack bar dimensions
Explore additional surfboard transportation techniques to enhance your understanding of secure mounting strategies. Different rack designs and board types might require subtle variations in attachment approach.
As you attach each strap, perform a gentle tug test to confirm initial security. The strap should feel firm and stable, with minimal movement when pulled. Avoid over tightening, which can create unnecessary pressure points that might damage your surfboard’s delicate surface. A good rule of thumb is to tighten the straps until they are snug but not constricting.
Pay close attention to the distribution of pressure across your board. Uneven strap placement can create stress points that might compromise your board’s structural integrity. Ideally, straps should be positioned at approximately one-third points from each end of the board, providing balanced support and minimizing potential warping or stress.
Complete your attachment process by visually inspecting each strap’s placement.
 Confirm that they are parallel, symmetrically positioned, and free from any potential snag points. A final walkthrough ensures you have not missed any critical details in the attachment process, setting the stage for safe and secure surfboard transportation.
Step 4: Securely Fasten Surfboards Using the Straps
Securing your surfboard to the rack represents the most critical moment in the transportation process. Precise placement and careful fastening will determine whether your valuable board remains safe during transit or risks potential damage. Your goal is to create a stable, balanced mounting that minimizes movement and protects the board’s structural integrity.
Position your surfboard carefully on the rack, considering its length and weight distribution. For longboards, center the board symmetrically across the rack’s crossbars. Shortboards require more nuanced positioning, typically aligned slightly forward or backward to maintain optimal weight balance. Orientation matters significantly in preventing unnecessary stress on the board during transportation.
Begin the fastening process by draping the first strap over the board, ensuring it passes completely underneath the rack crossbar and around the board. The strap should create a smooth, even contact point that does not bunch or create uneven pressure. Slide protective padding between the strap and board surface if your original equipment lacks built in cushioning.
Here are critical fastening considerations:
- Maintain consistent tension across straps
- Avoid overtightening which can damage board structure
- Check for even pressure distribution
- Ensure no fabric twisting occurs during fastening
Learn advanced techniques for board positioning to enhance your transportation skills. Understanding subtle nuances can prevent potential equipment damage.
Tighten each strap systematically, alternating between front and rear straps to maintain balanced pressure. Pull the straps firm enough to prevent board movement but not so tight that you risk compressing or warping the board’s delicate fiberglass or wooden construction. A gentle but secure grip is your ideal approach.
Perform a comprehensive stability test by gently attempting to move the board after fastening. The board should feel firmly attached with minimal wiggle room. Rock the board slightly to simulate potential road vibrations, confirming your straps can withstand movement without loosening. Any significant movement indicates you need to readjust your fastening technique.
Pay special attention to boards with unique shapes or delicate construction. Surfboards with complex contours or made from more fragile materials might require additional padding or specialized mounting techniques. Custom boards demand extra care to preserve their unique characteristics and prevent potential transportation damage.
Complete your fastening process with a final visual inspection. Confirm straps are symmetrical, buckles are secure, and no loose fabric could potentially catch wind during high speed travel. Your methodical approach transforms surfboard transportation from a potential risk to a confident, safe journey.
Step 5: Verify Stability and Proper Strap Tension
Verifying stability and strap tension transforms your surfboard mounting from a potentially risky endeavor into a professional transportation method. Thorough verification prevents potential equipment failure and ensures your valuable surfboard remains secure during transit. This crucial step bridges careful installation with safe travel, demanding meticulous attention and systematic checking.
Begin your verification process by conducting a comprehensive physical inspection of the entire mounting system. Gently attempt to move the surfboard in multiple directions simulate potential road vibrations and wind forces. The board should feel firmly attached with minimal lateral movement. Rigorous testing reveals potential weaknesses before they become critical issues during actual transportation.
Focus on assessing strap tension with precision. Straps should be taut enough to prevent board shifting but not so tight that they create undue pressure on the board’s delicate surface. Apply moderate pressure with your hands, checking for consistent tension across all attachment points. Uneven tension can create stress points that might compromise your surfboard’s structural integrity.
Here are critical verification checkpoints:
- Confirm no visible strap twisting or bunching
- Verify symmetrical positioning of straps
- Check for even pressure distribution
- Ensure buckles remain securely fastened
Carefully examine each strap’s connection points, looking for any signs of potential wear or potential failure. Fraying edges, stretched fabric, or compromised buckle mechanisms represent red flags that require immediate replacement. Preventative inspection can save you from potential transportation disasters.
Explore advanced surfboard transportation techniques to enhance your understanding of secure mounting strategies. Professional surfers recognize that thorough verification is as important as the initial installation process.
Pay special attention to board orientation and how it interacts with your vehicle’s aerodynamics. A slightly misaligned board can create significant wind resistance, potentially affecting vehicle handling and fuel efficiency. Adjust the board’s angle slightly if you notice any unusual vibration or resistance during initial movement tests.
Complete your verification with a final visual sweep, looking for any potential interference between the board, straps, and vehicle structure. Check that no part of the strap or board can potentially contact other vehicle surfaces during movement. Run your hand along the entire mounting system, feeling for any areas of undue friction or potential contact points.
Below is a checklist table summarizing the key verification steps and criteria you should review before hitting the road to ensure your surfboard is safely secured.
| Verification Step | What to Check | Why It Matters |
|---|---|---|
| Physical Stability Test | Gently move the surfboard in all directions | Ensures board is firmly attached and won’t shift |
| Strap Tension Assessment | Straps are taut but not overtightened | Prevents shifting without damaging the board |
| Symmetry Check | Straps are symmetrically positioned across board | Maintains balanced pressure, avoiding stress points |
| Buckle Security | Buckles are securely fastened and facing outward | Ensures quick adjustments and prevents loosening |
| Strap Condition | No fraying, wear, or damage on straps | Prevents strap failure during transportation |
| Final Visual Sweep | No loose fabric or points of contact with vehicle | Reduces risk of strap flapping and vehicle scratches |
| Board Orientation | Board is aligned for minimal wind resistance | Improves safety, fuel efficiency, and reduces vibration |
Your verification process should culminate in absolute confidence. A well secured surfboard should feel like a natural extension of your vehicle, stable and immovable. Trust your instincts and be prepared to readjust if anything feels even slightly off. Patience during this final step ensures a safe and worry free journey for both you and your surfboard.
Transport Your Surf Gear Safely and Protect It at Home
After learning the best ways to use surfboard rack straps for secure storage, you know how important it is to prevent damage and secure your equipment with precision. But the challenge does not stop at the journey. Wet gear can get damaged if left hanging on flimsy hooks or crowded on the bathroom door. Salt, heavy weight, and improper drying can all compromise your equipment. Surfboard owners want reliability from the moment they drive home to when their wetsuit is finally dry.
Take the next step and keep your gear protected with our heavy duty wetsuit hangers, designed to handle the weight and wetness after every surf session. These foldable, wide-shouldered hangers help eliminate the pain of stretching or tearing neoprene, and speed up drying. They are eco-friendly too, made from durable PLA+ material.
Make surfboard and wetsuit storage seamless and safe from your car to your home. For a hassle-free upgrade to your surf lifestyle, visit Surf Vida now and choose gear that works as hard as you do. Explore our solutions and experience peace of mind every step of the way.
Frequently Asked Questions
What equipment do I need to securely transport my surfboard?
You need high-quality surfboard rack straps, soft protective padding, a clean microfiber towel, a measuring tape, and work gloves. These items will help ensure safe transportation of your surfboard.
How do I ensure that my surfboard rack is securely prepared before attaching the straps?
Clean and inspect the roof rack or mounting surface, make sure it’s dry, verify the structural integrity of the rack, and confirm that mounting points are clean and undamaged to prevent any slippage.
How do I properly attach surfboard rack straps to the roof rack?
Align the strap with your predetermined measurement marks and wrap it around the rack crossbar without twisting. Ensure that the buckle is flat against the rack for a secure grip and that the straps maintain consistent tension across both sides.
What should I check after fastening my surfboard to ensure stability?
Inspect the mounting system by gently attempting to move the board and checking for any lateral movement. Ensure consistent tension across all straps, look for signs of wear or failure, and confirm that the board is properly oriented to minimize wind resistance.